Add & Configure an ONVIF Camera
An ONVIF camera is an IP camera supporting the Open Network Video Interface Forum standard. It lets Banalytics VMS connect to compatible cameras across brands using one configuration model for streaming, credentials, transport, and device metadata.
What ONVIF gives you
ONVIF promotes interoperability between cameras, video management systems, and other network equipment regardless of manufacturer. Adding an ONVIF camera component in Banalytics VMS gives you a reusable device record that can be used by capture, recording, motion detection, and remote monitoring tasks.
Prerequisites
Before adding an ONVIF camera in Banalytics VMS, confirm that the camera is reachable and that you have the credentials needed to connect.
Camera is powered and connected
The camera must be connected to power and to your network by wired Ethernet or Wi-Fi.
Camera is on the same local network
The device running Banalytics VMS and the camera should be on the same local network. The camera needs an assigned IP address and must be reachable from the server.
Verify connectivity with a network scan
Use Scan Your Network for IP & ONVIF Cameras to scan your local network, confirm the camera IP address, and verify that the device is reachable.
Have camera credentials ready
You need the camera username and password. Check the camera documentation, device label, packaging, or reset to factory defaults if credentials are unknown.
Adding an ONVIF camera component
Once the camera is reachable on the network, add it to Banalytics VMS as a component.
Open the Banalytics VMS interface
Navigate to your Banalytics server in the browser interface.
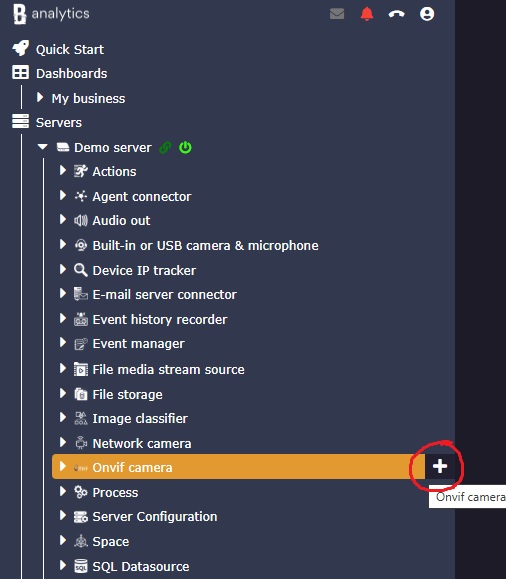
Find the ONVIF Camera sub-menu
In the left panel under your Banalytics server, locate ONVIF Camera under Components.
Create the component
Click the + button next to ONVIF Camera. The configuration panel opens for the new component instance.
Fill in the parameters
Enter the camera IP address, port, credentials, and transport protocol. The full parameter reference is below.
Choosing the right transport protocol
The transport protocol controls how video data moves between the camera and Banalytics VMS. Start with RTSP, then adjust only when your camera or network requires it.
Real-Time Streaming Protocol. High-quality streaming with low latency. Best choice for most deployments.
Guaranteed delivery. Useful on unstable networks, though it can add latency.
Connectionless delivery with very low latency. Best on reliable local networks.
Use when RTSP, TCP, or UDP are blocked or unsupported. Expect higher latency.
Configuration parameters
These are the parameters available when adding or editing an ONVIF Camera component.
| Parameter | Required | Description | Default |
|---|---|---|---|
ID |
Yes | Unique identifier generated automatically for this component instance. Read-only. | Auto-generated |
Restart on failure |
Yes |
Restart behavior after an error:
|
10 sec |
MAC address |
Optional | Unique identifier for the camera network interface. Find it in the camera web interface, through Scan Your Network for IP & ONVIF Cameras, or on the camera label or packaging. | - |
Title |
Yes | Human-readable camera name used throughout Banalytics VMS, such as Garage Camera or Front Entrance. |
- |
Host and port |
Yes |
Camera IP address and port number used by Banalytics VMS.
|
- |
Username and Password |
Yes |
Credentials for the camera web interface.
|
- |
Transport protocol |
Yes |
Controls how video data is transmitted between the camera and Banalytics VMS.
|
RTSP |
Override RTSP port |
Optional | Specify a different RTSP port than the one set in the camera web interface. Useful for port conflicts or custom network rules. The default RTSP port is 554. |
No (554) |
After adding the camera
Once the component is configured and running, set up a task that uses the camera for capture, recording, detection, or monitoring.